Search This Blog

Saturday, May 21, 2011

Mother's day gifts!


So all of the grandmother's received their mother's day gifts a few days ago and I wanted to share them with you. You could make these for any occasion really but I just thought these were so cute! They are supposed to be little photo albums with pictures of all of the grandkids. I found this idea from this blog: http://www.brownpaper--packages.com/2009/12/purse-sized-photo-brag-book.html
I just decorated each photo to be unique and all of the grandmother's loved it!

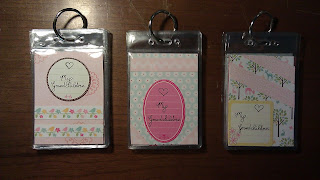
 Here are all 3 finished albums!


This one was for my mother!

Initials of all her grandchildren on the front with an extra one that says "My Grandchildren"!

And the picture's on the back with an extra one that says "We Love you Gammys"!

The one was for my mother in-law!

The front with all the initials and the extra one that says "My Grandchildren"!

The back with all the pictures and an extra one that says "We love you Grandma Michelle"!

This one was for my stepmother in-law!

The front with all the initials and an extra one that says "My Grandchildren"!

The back with the pictures and an extra one that says "We love you Nana"!

You may notice that some of them didn't have pictures. That's because I didn't have pictures of those grandkids to put in there. Some aren't born yet, lol!
And of course I thought this idea was so cute I just had to make one for myself!

The front of my album!

One side with all my childrens initials!

The other with all the pictures!

Tuesday, May 10, 2011

Enough for two tutu's!

So in my post last night I said that I didn't have enough tulle to make my 5 month old daughter a tutu, but as it turns out I had just enough. I still need to buy a little more to fill in some holes but it came out pretty cute. I wanted to do a 2 tone color but only had purple left. Still came out nice! I also made her a headband as well but clipped on a big flower instead of glueing tulle onto it like my other daughters headband!

Close up fo the big flower clip!

Sitting on the couch!

What is all this stuff!

What a little princess!

Sitting on Daddy's shoulders!

Will be making more tutu's in the future! :0)

Monday, May 9, 2011

A tutu for my little princess!

I saw this little girl the other day wearing a tutu made from tulle and thought it was just too adorable. So I decided to make one for my 2 littlest girls. Unfortunetly I didn't buy enough of it to make 2 so I didn't get to make my 5 month old hers :0(
But my 2 year old loves hers so much, she won't take it off now, lol! I found this really easy tutorial on how to make them below:
http://www.gophotography.com/tutu/

I will difnitely be making a bunch more of these tutus in the the future!!! :0)


I think I ended up making hers a little too long but oh well. She will grow into it!!! The head band I made myself with stocking, tulle pieces and ribbon and some hot glue!!!

Chore board with left over craft stuff!

I've been wanting to make a chore board for my kids for some time now and the other day I came up with a great idea. I decided to use the extra scrabble board that I had from my past project, along with the letters and also left over scrapbook papers from the mother's day gifts I had made! I figure I should put them to use, other wise they would just be laying around for a while, and here's what I made!

This is the extra scrabble board I had laying around!

I flipped it over and used the back part. I put a line of glue down the middle so it wouldn't fold in half!

Started taking my pretty left over scrapbook paper and over lapping them down the center! I glued the entire pink one down and then as I over lapped the others I only glued the sides and the bottom so that I could slide in chore cards!

The middle is all done!

Then I added a strip of scrapbook paper on both sides of the board. Along with some flowers cut out from the scrapbook paper as well. I also glued some buttons in the center of the flowers!

I used scrabble letters on top for the CHORE-BOARD part and just wrote the kids names and stuff with marker!

Then I cut out rectangular pieces of scrapbook paper and glued more scrabble letters to the tops of the chores and wrote in the rest! Great way for my 3 year old to get to know her alphabets better!

And here it is all finished. I just need to glue some string to the back and hang it up on the wall!!! :0)

Sunday, May 8, 2011

Bag sale bargain!

Today I got up super early to get to a bag sale that was going on at the local thrift store here on base. Of course the parking there isn't great so I showed up a half hour early to get a spot. My hubby kept the 3 little ones while I brought along my oldest daughter and her friend. I love these bag sales BTW. Anything you can fit into a brown paper bag or a green commissary bag for only $5 dollars! I was in there for about an hour and a half and made out with 6 bags full of clothes and a few other stuff!

Here's my lot of clothes. My 2 littlest girls really needed some new clothes and I came out with plenty. And it only cost me $30. I also got clothes for my oldest daughter, son, myself and a few for my hunny!!! Can't wait for the next bag sale!!! :0)

Friday, May 6, 2011

Scrabbled up!

A few weeks ago my darling little daughter Oliviah, who will be turning 3 soon, decided to get into my game closet and play with my scrabble game. Well, needless to say she lost some of the letters! Since it was quite an old scrabble board game anyway, I decided to do something crafty with it instead of just throwing it away.
 I went to the thrift store and found the exact same scrabble game for only $1. When I got home, of course some of the letters from that game were missing as well, but I wasn't concerned about that. I just wanted the game for the extra letters any how. And this is what I did!!!


I took my hot glue gun and put a line of glue down the back center of the scrabble board to keep it from folding in half. I also took a piece of string that was laying around and hot glued the ends to the back as well so I could hang it up like a picture frame!

Then I layed out the scrabble pieces so that they would spell out our last name and everyone else's names in the family. Along with some other kind loving words as well. When I was happy with the layout of the words I hot glued all of them down!

    Hung it on the wall and *TA-DA* all finshed!!!

Here's a close up!!! Hope you liked!!! :0)

Mother's Day crafts complete!

For the past few days I've been trying to finish these cute and simple Mother's Day gifts for all the Grandmother's and I finally finished them yesterday! Unfortunetly I cannot post any pics or info yet because none of the Grandmother's have received them yet and I don't want to spoil the surprise by having them see it on my blog, lol!!! But as soon as I know they have all received their gifts I will post pics and info about them!!! :0)

I did, however, finish another project today that I will share with you all in my next post!!!

Tuesday, May 3, 2011

My daughters Rapunzel hair!

So the other day I found this cute blog site that has so many cute ideas for doing up your childrens hair. This was a great find for me since I'm always looking for new things to do with my oldest daughter Yesenia's crazy long Rapunzel hair, lol! There are also easy to follow tutorials and the ideas are so adorable and pretty simple to do. I admit, they do look pretty intimidating when you see the finished hair-do, but they are actually very easy I think!

Here is one that I did the other day for her. I didn't follow the tutorial for it and just did it from photogenic memory lol, so it didn't come out exactly how it was supposed to look, but it still looks pretty cute!

I didn't braid it all the way down so there was quite a bit of hair left un-braided towards the bottom, which you can't see in this pic! Here is the tutorial below for this hairstyle, very cute:


This one I did this morning and tried to follow the tutorial. I was in a little bit of a rush to get them off to school so I wasn't able to take my time with this the way I wanted to. Still a pretty cute hair-do though!

The back!

Top from the front!

Left side!

Top view from back!

She was happy with it!!! :0)
Below is the tutorial:


So of course after I had done Yesenia's hair that morning Oliviah wanted her hair done too. So we took the kids to school and I promised to do her hair when we got back. I'm really happy with how this one worked out but it was a little difficult since her hair is so thin, because I had to make teeny tiny braids lol. Plus I thought her hair wouldn't be long enough to pull it off , but it worked and came out super cute! I love it!

Here's the top view!


Right side!

Left side!

She was so happy with her hair done up all pretty!!! :0)

Below is the tutorial:


Picture day at home with my 2 littlest daughters!

Today I did some at-home photography with my basic camera and the camera on my phone. I needed some pictures to print out for some Mother's day gifts I am going to be making for the Grandmothers. Since my 2 eldest children are in school, I had already ordered their spring pictures this past February. (Their school takes pictures twice. Once in September and then again in February) Their pictures are below!

My oldest *almost* 10 year old daughter Yesenia!

My 8 year old son Adolfo!

 So I just needed pictures of my 2 littlest girls! I dressed them up in their little Navy dresses (since their Dad is in the Navy) and snapped away!!!  These below are just a few pictures that I took on my phone. I think I got some good ones! :0)

My *almost* 3 year old daughter Oliviah

Sideways pose :0)

What a cheesy smile, lol!

Wearing daddy's hat!

I love this pic with his boots and hat!

My littlest *almost* 5 month old daughter Natalia!

Navy Princess!

Laying on daddy's uniform!

I love how this one turned out! :0)

After all the photography was over, we headed out to the store to have them printed out! I did the 1-hour photos so they we're a wee bit more expensive, but still very cheap. I also printed out 2 extra 8 by 10's to display at home!!! :0)