Search This Blog

Friday, April 29, 2011

Everyone needs a good idea for a homecoming sign!

People are always looking for a cute/unique homecoming sign to make for their loved ones, especially when they return home from a long deployment! So I decided to share some of the ones I have made and help make so far!!!

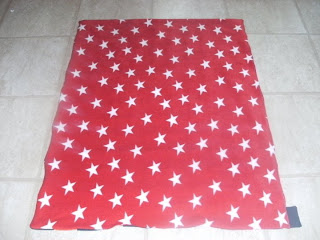
This was the second sign I've made for my hunny so far. This was back in November of 2010 for his return from Japan. We've only been through 2 deployments so my sign making ideas are still pretty fesh, lol! I made up this poem myself for my children to use as a sign for their Daddy.Both sheets were twin size if memory serves right. It says "This is our flag in red white and blue. We made it special because we love you! Welcome Home Daddy!" And I also had them make a flag out of their footprints and handprints! They had so much fun making this!!!

This was the very first homecoming sign I made for him back in 2009 for his return from Iraq/Italy. I used a white queen size sheet that I got for a couple bucks from the thrift store. It's based on the MasterCard commercial, lol. It says "Stamps to mail you letters: $50, Phone cards to call you: $100, Paint, brushes and sheet to make this for you: $40, Being able to hold you for the first time in months: Priceless!  Welcome Home Hunny Bunny". This one took quite a while to paint but turned out amazing. I had so many people stopping to read it, lol!

Here is a sign I drew up for a friend that was also a queen size sheet. It says: Now that you're home here is your honey-do list: 1. Hold me 2. Hug me 3. Kiss me 4. Love me!" And I drew up a honey pot over flowing with honey and the bee's are coming to carry some away in the shape of letters that spelled out I LOVE YOU!!! :0) 

This is another one I drew up for her daughter. This one was a full size I think. It says: "Daddy do list: 1. Go for a bike ride 2. Go to the movies 3. Build a sand castle!". On the bottom I drew a big sand castle with some clouds above it!

And here are some homemade ribbon lei's I made for him as well. Since we live in Hawaii, giving lei's is something you just gotta do. The red, white and blue cigar lei was to be from me and the other 4 illima lei's were from each of our children. Including our then *unborn* baby Natalia!

Safari baby shower cake!

This weekend I have been put to the challenge by one of my friends to make a safari themed baby shower cake. It's going to be a mint chocolate cake with mint buttercream icing and a mint MMF. Of course tonight I'm going to be making a practice batch of it all so fingers crossed it comes out yummi. I've also bought some Ande's mints to add to the cake mix (and to snack on, lol)! I bought some white chocolate pieces that I'm going to make into modeling chocolate for the animal figures. First time working with modeling chocolate as well so once again, fingers crossed the animals make it! I will post the cake recipe and pics of the cake later this weekend once I've finished it all!!! Wish me luck! :0)

What to do with these old things?

So last year when the Navy got their new cami's my hunny's old uniforms were just haning out in our closet making friends with the dust. So I came up with an idea to get them out of the old dark closet, and put them to use in other things that they could be seen/used in almost everyday!


Here they are before I chopped them up into pieces, lol!


And here is something I made it into. I found the Navy symbol pattern at wal-mart in the fabric sections and sewed it in the center. The back is a plain red fabric that has his old name tag sewn on! I have it hanging in the living room where all of our guests can see it!!!

Here's something else I made for my middle daughter Oliviah. Now she can always have a piece of daddy to snuggle and hold onto when he's gone!!! :0) 

This is the other side of the blanket. It's a soft fleece type. The little tag on the bottom right was for her initial's to be sewn on later, since I am going to make a blanket for each of my children to have, that way they won't fight over who's blanket belongs to who, lol!!!

My daughters personalized Justin Bieber bag!

So last year when Justin Bieber was driving my oldest daughter (and most other girls) crazy, she wanted to start the school year off with a Justin Bieber bag. Well, they weren't selling them yet so I decided to make her her own personalized bag! (We live in Hawaii so school starts around the very end of July here)
I bought about a yard of jean like fabric, a JB shirt from Wal-mart and some matching ribbon. Sewed that jean fabric into a bag shape, cut out JB from the shirt and sewd him onto the bag with some ribbon to go around!!! All of her friends wanted it, lol!!!

A little blast of my crafts from the past!

Last year I started to really get into sewing. I started making baby car seat canopies and other baby things. Very cute, but very time consuming. After I had my baby in Decmeber of 2010, I just couldn't find enough time to keep up with making them. Now that I'm back into a schedule, I'm sure I could find time somewhere to make these is requested to do so!!! I think, lol!!!

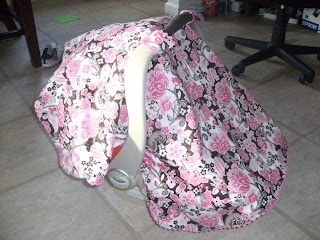
In the two pictures above are car seat canopies. I actually used the pink floral one for our newest addition Natalia!

Burp cloths that I made to use for Natalia as well. I just bought a bag of regualr white burp cloths and some different patterns of cotton flannel (I think it was?) and some matching ribbon, sewed the pattern in the center of the burp cloth and covered the sewn on parts with ribbon to make it look nice!

Here's a bib and matching wipe case! They actually match with the car seat conapy in the picture above!

Here's is the diaper bag set I made for myself to use for Natalia. There's a Diaper bag with 2 bottle pockets on the outside and 3 big pockets on the inside. A mini medicine bag, changing pad and a wipe case!

And below are some of the other patterns of wipe cases that I have made!!!


Thursday, April 28, 2011

Past cake creations!

Just felt like sharing all of the past cakes that I've made! Enjoy!!! :0)


Ninja Turtle for my son Adolfo's 5th birthday! November 2007

Welcome Home Navy cake for my hubby Thomas who returned from deployment! June 2009

Cupcakes shaped like a guitar for my oldest daughter Yesenia's 8th birthday! July 2009

Winnie the Pooh cake for my middle daughter Oliviah's 1st birthday! July 2009

Spiderman cake for Adolfo's 7th birthday! November 2009

Airplane cake for a friend! December 2009

Snowman cake for Christmas! December 2009

Spiderman cake for a friends son! 2010

Daisy flower cake for a friends birthday! April 2010

Jonas Brothers cake for my oldest daughter's 9th birthday! July 2010

Very first time with fondant! 2011

Bee cake for my Aunts birthday! March 2011

Bow/ribbon cake just for fun! 2011

Beach cake for my daughters friends birthday! April 2011

Coka cola cake for my Grandma's 81st birthday! April 2011

Aloha flip flop cake for some friends who left the island! 2011

Pink zebra stripe cake for my daughters friends birthday! April 2011

Celebrated my cousins birthday on Easter!

So as well as celebrating easter at my Aunts house, we also celebrated my cousin David's 17th birthday. So as a surprise I made him a Stormtrooper cake! It was a vanilla cake covered in a new mint buttercream fondant recipe I had found! Everyone enjoyed it!!! :0)


Fruity Easter Basket!

Here is a fruit easter basket that I had made to take to my Aunts house for easter dinner! It's filled with cantaloupe, honeydew, strawberries, blackberries and pineapples. I also took some easter shaped cookie cutters and cut out some of the fruit to stick on some skewers!


Strawberry tulip!


Looks so yummi!


Strawberry with a blackberry on top!

Easter has come and gone!

So Easter is over but I just wanted to share some of the crafts that I had found and done. Very simple cheap little crafts that were very fun to make and came out pretty cute! Like this easter egg wreath in the picture above! Just needed a piece of cardbaord cut into a circle, 2 bags of plastic easter eggs, a bag of grass, hot glue gun and a pretty ribbon! Here's a great tutorial:

This one was so simple, I actually had my kids help make it. Just shove some thin skewers in the plastic eggs (the eggs already have holes in them) and arrange them in a nice vase. I cut a few of the skewers to give them different heights and then just tied a bow around the vase and TA-DA!!!


This is an easter egg tree, the kids thought it was adorable that my oldest daughter just had to place her hand towel bunnys next to them that she had made at school (they are in the picture above with the easter egg bouqet)! The eggs are just hot glued to a cone shaped piece of styrophome (home I spelled that right, lol), and then you just shoved some grass between the cracks! Here is the easy tutorial:

My very first blog!

Well, here we are on my very first blog page EVER! I've debated making one for a while now and finally plucked up enough energy to make one. Wish me luck! lol